The flat lay technique has been popular for many years. Professional photographers use it to promote different products for clients or advertise their own businesses.
If you want to learn more about flat lay photographs, you’re in the right place. Here is a complete guide to help you master this photography technique in no time.
What Is Flat Lay Photography?
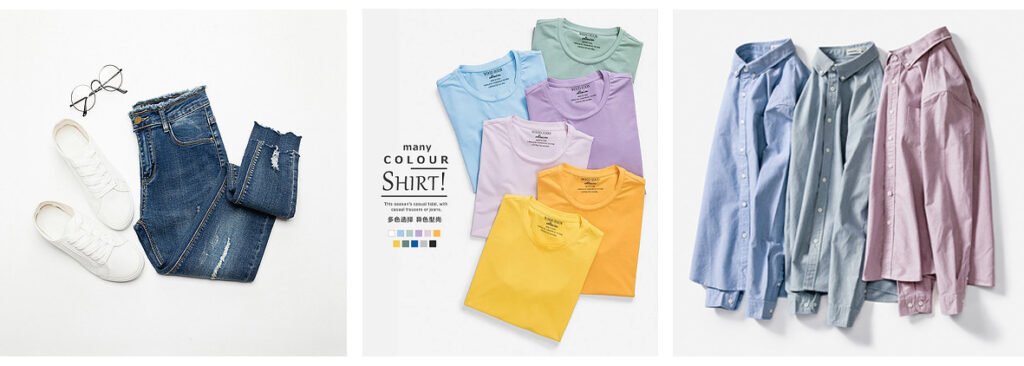
Flat lay photography is performed by laying your promotional objects on a flat surface. The picture is taken from above the items to give a bird’s eye view.
You can use this technique to tell a story and improve your brand awareness. The primary feature of flat lay images is that they are more organized, and viewers can imagine the items easily.
Typically, you may have seen many flat lay photos on Instagram because of their high popularity.
Why Is Lay Flat Photography Popular?
If you want to know more about flat lay photography benefits, here are the top things you must know:
1. Creates A Balanced Flat Lay Photo
Flat lay pictures can help you create a balanced product photo without much effort. This is because things that are laid out on the entire flat lay surface are connected to one another.
The organization between the things can intrigue the viewer more easily. The best part is that flat lay photography is highly appealing because of the simple idea.
Laying out things in a neat manner is one of the ways to ace this photography technique.
2. A Flat Photo Easy To Work With
Another reason behind the popularity of a flat photo is its convenience. The technique is easy to work with because you don’t have to worry about the background much.
Laying out things is also not time-consuming, so you will not be tired because of the technique. The best part about this ease of use is that you don’t require high photography skills.
If the backdrop is neat and the lighting is good, you don’t have to worry about the results.
3. A Flat Lay Photo Helps You Tell A Story
Many brands use flat lay photos to tell a story about their company or its founding. The objects on a flat surface can also be organized in a specific order to tell a story.
Using the items with interconnected objects will improve the consumer’s thinking. For instance, uploading a picture of a floral dress may make your clients find the dress pretty.
However, you can pair the item with different objects to tell a story. You pair the floral dress with slippers, sunglasses, and other items to imply the dress is best for a beach trip.
4. Flat Lays Are Social Media Friendly
A flat lay photograph is also social media friendly to help you upload the picture on different platforms. The main application you can use for spreading your flat lay shots is Instagram.
This social media network is accessible through a mobile phone and browser. Flat lay images are also pre-cropped, so they can fit the frame size of different platforms.
Of course, you may have to edit the image a bit before uploading. The best part is that flat lays will save you time during posting.
5. A Flat Lay Photo Helps You Capture Every Detail
Flat lay photography is also popular because it can help you capture every detail of different objects easily. You also don’t have to worry about overflowing the image because of efficient placement.
You can use the corners of different objects in the flat lay photograph. Using partial parts of items mean that you can save space for other things while maintaining the aesthetics.
For instance, a picture of the corner of a keyboard and the edges of the screen is easier than capturing the entire laptop in flat lay photographs.

Tips For Mastering Flat Lay Photos
Taking flat lays may seem easy, but that is not the case. You must think about camera settings and other factors before capturing the shots. So here are the top flat lay photography tips for mastering the technique:
1. Use Light Correctly
One of the best flat lay photography tips is understanding the light and using it correctly for the shoot. You can use natural light or artificial light for this type of photo session.
Of course, natural light is a better option for flat lay photography. You can allow light to enter the room through skylights or windows. The best part is that the window will soften the light and diffuse it to avoid shadows.
A bright room is a better option for flat lay photography than low-light conditions. Another way to avoid deep shadows is by using a white sheet or sheer curtain to obtain soft light.
You should also not take flat lays under direct sunlight. Instead, create a flat lay photography scene on a cloudy day or shaded spot to avoid shadows and getting a clear image.
2. Pay Attention To The Background
Creating a perfect flat lay photo requires you to pay attention to the flat lay background. You must select a surface with neutral color and tone for the best experience.
If your background is dark, smaller props of grey or black color can disappear easily. Meanwhile, using bright background can increase the contrast significantly and make the image an eyesore for a viewer’s eye.
This is why you must perform effective flat lay photography by choosing a background from lighter shades. One of the top flat lay photography ideas is to use wooden surfaces for the background.
They enhance the visual interest and allow the professional photographer to take gorgeous photos for product photography easily.
3. Ensure Uniformity Between The Items In Flat Lay Photos
Another way to create the best flat lay photo is by ensuring uniformity between all your props. This means they must complement each other and help you create a story more easily.
The primary purpose of the different items is to contribute to the larger scene to enhance interest. The background and the items must blend to help you take a great flat lay photo.
You should also edit the image’s texture to increase the visual appeal and attract more potential customers through your flat lay photo. Unity between objects can also be achieved by using correct placement.
For instance, it is better to avoid negative space when laying out the objects to get the perfect shot. You should place the main subject and secondary items in such a way that they should overflow the frame.
Typically, parts of different items in the flat lay image will help you create a better scene and enjoy enough space without cluttering the picture.

4. Take Flat Lay Photos From A Height
Flat lay photographs are taken from above the objects. This means that you must be at a specific height to capture the photos without being afraid of shadows.
You can stand on a step stool for taking great flat lays in no time. Remember to avoid taking a very wide shot because it can distort your flat lay photo.
This can have a negative on the objects laid out and reduce the image quality. Standing on a ladder may help you get the perfect wide angle without distorting your flat lay photo.
The camera should be directly above the main objects, creating a bird’s eye view for the viewer. A stand to hold the camera in a specific position above the objects can be helpful for taking the flat lays easily.
5. Use A Tripod
Another way to take a flat lay photo is by using a tripod to keep the camera directly above the focal point. This setup is mainly suitable for still life photography without shadows.
You can easily focus on the scene without continuously adjusting the camera lens to the correct position. A tripod arm can also allow you to hold the camera down to create a scene without shadows and glares.
The best part of using this accessory for your flat lay photo is that the experience will be more hands-free. Of course, remember that using an arm with this accessory can decrease the tripod’s balance.
So you must cushion the ground by using sandbags to keep the tripod in a balanced position. These precautions will prevent your camera from suffering any damage while you capture your flat lays.
6. Create A Vibe
You must create a vibe during your flat lay photo for product photographs to attract customers. The best part about using objects to improve the shot is that they will help you form a visually appealing flat lay photo.
However, the vibe or atmosphere of the image must exhibit a sense of activity or person. The objects can help you create a frame that will express your thoughts easily.
Remember, you can also use human models for taking the best flat lay photo on a cloudy day or under artificial light. Another great thing about these pictures is that you can create a scene without using the person’s face.
For instance, you may use the arms and legs of the model in the picture to create a scene.
Someone’s exposed legs with accessories such as cocktails and sunglasses nearby on a sandy backdrop can help create beach vibes for an excellent shot.
7. Take Inspiration From The Internet
You may not have the best ideas for your flat lays because of a lack of creativity. Of course, you may be creative but suffering from a block due to stress and other reasons.
Whatever the case, taking inspiration from the internet for a flat lay photo can be helpful. The best site for inspiration for a flat lay photo frame is Pinterest.
Many people upload aesthetic images on this platform to inspire others. So you can use those pictures to create an excellent flat lay photo for your professional photography needs.
Remember to use the rule of thirds when you lay objects for your flat lay photo. A square format is better for taking such pictures to easily upload them on different social platforms.
8. Benefit From The Color Theory
A flat photo can also be improved by using the color theory for the backdrop and objects. You can use shades that align with each other to enhance the picture’s unity.
The best part is that the color wheel will also make it easier to choose the shades, depending on your needs. For instance, red is the primary color for promoting a call to action because it encourages people to make purchases.
Meanwhile, the green theme is better if you are promoting healthcare products through your flat lay photo. Following the right colors for still life photography and other types will make it easier to attract the audience.
It can also offer more flexibility when you lay the different items for flat lay photography.
9. Start Small
Starting small is another thing that can help you create appealing flat lay photos. You should add a few objects on the flat table or surface and capture a shot for your needs.
Typically, you should add more items to the table slowly and take more shots. The best part about conducting flat lay photography like this is to help you capture more pictures and cover the entire process.
You can use the different images to build curiosity about the main subject. It will also help you convey the story of your flat lay photographs better.
10. Use Geometry For Appeal
Using geometry to enhance the appeal of product photos is one of the best flat lay photography ideas. The best part about shapes and patterns is that they can create a neater look for an organized appearance.
So the chances of the viewer getting distracted while seeing the flat photo decrease. The best part about a geometrical flat lay photo is that you can enjoy more creative flexibility.
This is because of the wide variety of patterns and shapes you can create. Objects such as leaves can also be used for mastering the flat lay technique.
11. Edit The Flat Lay Photos
Photo editing is necessary after taking the flat lays for the best results. You will have to change the settings of different picture aspects. For instance, you may have to adjust the brightness to avoid shadows.
Besides that, you may use a crop tool and align the picture in the frame. The best photo editing tool on the market is Adobe Photoshop. However, you may also use Canva or other apps for ease of use.

How To Edit Your Flat Lay Photo?
Here are the top ways you can edit your flat lay photo to enhance the results:
1. Adjust The Lighting
Adjusting the light of flat lay images can help you achieve a more natural look. You should change the brightness to enhance the appeal of your flat lay images.
Exposure, contrast, and highlights are some other aspects that you can enhance your photos. These things will enhance the flat lay photo quality.
2. Realign The Shot
Realigning the shot using the crop tool is also necessary for excellent flat lay images. Typically, you should adjust the picture until the gridlines intersect for the best frame format.
Making the gridlines intersect may seem hard, but it will be easy if you focus on the larger scene.
3. Enhance The Texture
You must also enhance the texture of your flat lays by using the retouch tool to soften the picture. Meanwhile, the vignette option can help you make the edges darker for an aesthetic appearance.
An improved texture will enhance your flat lay quality for a better photography experience.
4. Remove Unwanted Objects
Removing unwanted objects from your flat lay photographs is also necessary to avoid distractions in the picture. You can use the selection or lasso tool on Adobe Photoshop for this purpose.
5. Save The File
Finally, save your edited flat lay photo file to upload it to your online store later. The best format for flat lay photography is JPEG or JPG.
You should also ensure a file size of lower than 50 Mb for easy compatibility on various platforms.

Final Thoughts
This is everything you need to know about flat lay photography. You can master the technique by following the earlier tips. Remember to use a non-reflective flat surface, such as a wooden surface, for your flat lay photo.
Keeping your camera at a specific height and using the rule of thirds will also help you capture the perfect flat lay photographs. Using creative flat lay photography ideas will also be helpful.
So be sure to keep all these things in mind for flat lay photography ideas and tips.

